This website uses Cookies. Click Accept to agree to our website's cookie use as described in our Privacy Policy. Click Preferences to customize your cookie settings.
Turn on suggestions
Auto-suggest helps you quickly narrow down your search results by suggesting possible matches as you type.
Showing results for
- Looker
- Articles & Information
- Technical Tips & Tricks
- Looker Multistage Development Framework (Dev->QA->...
Topic Options
- Subscribe to RSS Feed
- Mark as New
- Mark as Read
- Bookmark
- Subscribe
- Printer Friendly Page
- Report Inappropriate Content

 LinkedIn
 Twitter
davidtamaki
Staff
Topic Options
- Article History
- Subscribe to RSS Feed
- Mark as New
- Mark as Read
- Bookmark
- Subscribe
- Printer Friendly Page
- Report Inappropriate Content
2
4
21.7K
Looker will not be updating this content, nor guarantees that everything is up-to-date.
Starting in Looker 7.12, you can deploy any Git commit SHA, tag, or branch to production with Advanced Deploy Mode. This helps consolidate repositories in multi-environment developer workflows, where each environment points to a different version of a codebase. It also gives greater control to one or a few developers or administrators over the changes that are deployed to production.
Introduction
This article provides a comprehensive development framework for managing the promotion of LookML code and content across multiple Looker instances and is intended to aggregate various resources into a cohesive walkthrough, provide a deeper understanding of the advantages and disadvantages of having multiple Looker instances, and present a best practice framework for a development strategy.
In This Article
- Why Have Multiple Looker Instances?
- Release Management
- Is a Development Instance Necessary?
- Benefits and Disadvantages of Additional Instances
- Extra Options for Testing
- Overhead and Speed
- Control, Security, and Uptime
- What Would the Release Cycle Look Like?
- Suggested Workflow
- Automation Examples
- Stable Dashboard URL Mapping
- LookML Dashboards
- How Many Instances?
- Where to Create Content
- Conclusion
1. Why Have Multiple Looker Instances?
Release Management
In traditional software development, it is necessary to have separate environments for various stages in the development pipeline. The best practice in system administration advises isolating the various activities occurring concurrently in at least three separate environments [1 2 3]:
- Development: Developers use the development environment to commit code, conduct experiments, fix bugs, and safely make mistakes.
- QA: Also referred to as a test or a staging environment, this is where manual and automated tests are run. The QA environment is complex and can consume a lot of resources. This environment is used as a mixing ground for reviewing changes.
- Production: This is where value is created for customers and/or the business. Production is a highly visible environment that deeply impacts your reputation and brand name. The production environment should be as free of errors as possible.
This traditional software development view emphasizes that all these activities should not occur in the same environment. In Looker terms, this would mean compartmentalizing development functions to keep them separate from analytical functions.
The key benefit of multiple environments is that content validation occurs in a non-production environment, thus ensuring that any modifications to the model logic result in accurate figures for existing content. It also allows for performance tests on new LookML code to prevent any reports and subsequent analysis from grinding to a halt. If you plan on embedding Looker for your customers, or if 100% uptime of content is a requirement, then it is recommended that the development and testing activities be kept separate.
However, for non-critical use cases, it may be manageable for all these activities to happen in the same environment. Using Git, developers can experiment in separate branches away from master (production). Tests can be incorporated as part of the regular deployment process, with performance tests occurring overnight, to minimize the impact on your users.
Furthermore, a well-planned, well-timed release cycle could mitigate the need for multiple environments. The BI team could notify all business users about scheduled downtime when releases and updates are to occur. By leveraging the Looker API, both content and LookML code could be updated in a single step.
The next section delves deeper into the scenarios where additional instances would be an asset, and where they would be a hindrance.
Is a Development Instance Necessary?
Development teams often assume that they need multiple instances/environments. However, the built-in Looker development workflow is sufficient for most deployments and, with enough understanding and proficiency, it should cover most teams' use cases. We'll start by walking through this native LookML development workflow to better understand whether multiple Looker instances are needed.
Looker uses Git for version control for each project. This allows developers to modify LookML code and not impact other users until those changes are vetted and deployed to master, which Looker production uses. This development is performed by LookML developers who make changes in their Development Mode, which can be either a personal or a shared branch for collaboration. When developers are finished making changes to the project, they may then deploy those changes to production, which is then visible to all business users.
Looks and dashboards, the saved content inside Looker, are not stored in the LookML, but instead reside in the internal database along with all the metadata for the application (the one exception to this is LookML dashboards — more on this below). Because content is built on top of the LookML model, changes to the underlying names of LookML objects (like a field or a view) can break existing content. For example, changing the name of a dimension from name to full_name will affect all content including name (unless you used the alias parameter). Developers can use the Content Validator to list all content that uses the name field, and then easily address any errors by replacing name with full_name, or deleting the affected content. It is advisable to use the Content Validator to fix affected content immediately before or after code is deployed to production, so that any affected content is broken for the minimum amount of time.
Generally, this is the process for managing the promotion of code and content in a single instance. Because developers can view the entire Looker instance in their Development Mode, a separate development environment is not required. However, the simplicity of a single environment does have a drawback as there will be occasions, however minimal, where content could be broken. The larger (in terms of scope as well as team) and more rapid the development is, the more often content will be broken. If the goal is 100% uptime, then it is most likely that additional instances are needed.
Mapping out what your ideal deployment workflow looks like will help you to understand your requirements. Some questions to consider are:
- How important is a fast release to your business — for example, should new Explores and content be released to your users daily or weekly?
- Do you intend to update in cycles, or with continuous deployment?
- Is it acceptable to have temporary downtime while content is being fixed, or do you want a set of managed content that is always functioning?
We will go deeper into these questions and other factors to think about in the following sections.
2. Benefits and Disadvantages of Additional Instances
Extra Options for Testing
The primary reason to have one or more development instances is to test LookML code against existing content before it is deployed to production. By doing this, you can ensure 100% uptime of content. It's also the ideal setting for experimenting with instance-wide features in isolation, like turning on or off beta and experimental Labs features, testing the effects of turning off a legacy feature, and trying out a different authentication protocol.
Multiple instances are also useful for testing before making a substantial update to the Looker release. Customers on the Extended Support Release (ESR) cycle are required to have a staging server to test the waters before making the update on their production instance. This is to ensure ample time is given to testing new features, workflow changes, and issues before updating production.
Additionally, for data models that use a complex datagroup caching strategy (used for caching query results, triggering PDT regenerations, and scheduling content), modifications can have a significant impact to the underlying performance of queries and data delivery. Once enabled, these features and caching policies impact all users, so it is beneficial to first test them in a QA environment before using them in production.
Organizations that are leveraging Looker's single sign-on (SSO) embedding also require a production environment that is as error-free as possible, since any disruptions will be immediately visible to their customers and could negatively impact their customers' experience. SSO embedding always runs in Production Mode, so it is necessary to have a staging environment where LookML code can be deployed and tested before those changes are made visible to external users. Therefore, separate instances for development and testing are required for embedded analytics use cases.
Overhead and Speed
If you choose to have a development instance, you will incur an initial adoption cost of setting up the environments and linking them together. It will take some time to plan and develop a robust release cycle. However, once this is set up, the pace of development should amount to that of a single instance setup.
A common misconception about multiple environments is that they result in slower development. While the pace of content and code reaching production is reduced, the pace of development should remain the same if the development instance is set up correctly. In other words, the delivery to users will indeed be delayed and staged, but overall productivity will be sustained. LookML development does not stop once code reaches QA; developers simply move on to the next project.
The key factor in retaining the same speed of innovation is having the necessary resources to roll out a multiple-instance setup. Having a team of developers who are familiar with the Looker API and Git is a prerequisite; otherwise, the many layers will simply cause an obstruction. In cases where this skillset is absent, a single, well-managed instance would be more effective.
On the other hand, a single instance will have the capacity to deliver updates to users more frequently. This is because a single-instance setup can deploy LookML code to the master branch more regularly, although this will be riskier for the reasons mentioned earlier. Some questions to help you understand the implications of overhead and speed are:
- Is it a low priority to have an agile environment that can release new features to users?
- Is your development team familiar with the required tools for managing multiple instances?
If the answer to these questions is yes, then a multiple-instance setup is recommended.
Control, Security, and Uptime
Another reason to have additional Looker instances is to have more control over the LookML development cycle — specifically, which code is promoted to production at particular times. Because no LookML development occurs on the production instance, there is a low risk for any errors, broken content, or unperformant queries being visible to or otherwise negatively affecting business users.
This means that having separate instances should eliminate the need for any downtime while development is continuing. The main processes of development cycle, content validation, and QA tests can be addressed in other environments, along with any other system-wide tests. For users, content will always function as expected. This is important for global use cases where business users will be running queries at all times of the day.
It also allows for more discrete provision of access. Users can have pared-down roles in different environments for different purposes, which will provide better security.
For example, a non-developer can perform user acceptance testing (UAT) in a QA environment, rather than acquiring developer permissions (to view a shared Git branch) in the production environment. Instances can be set up to point to identical database schemas, but with stored dummy data used for development and performance testing. This is relevant for large Looker deployments, where it would be beneficial to test LookML code changes and run more thorough tests without risking performance impacts on the production instance.
3. What Would the Release Cycle Look Like?
Depending on your requirements, there could be several valid strategies for a Looker release cycle.
Suggested Workflow
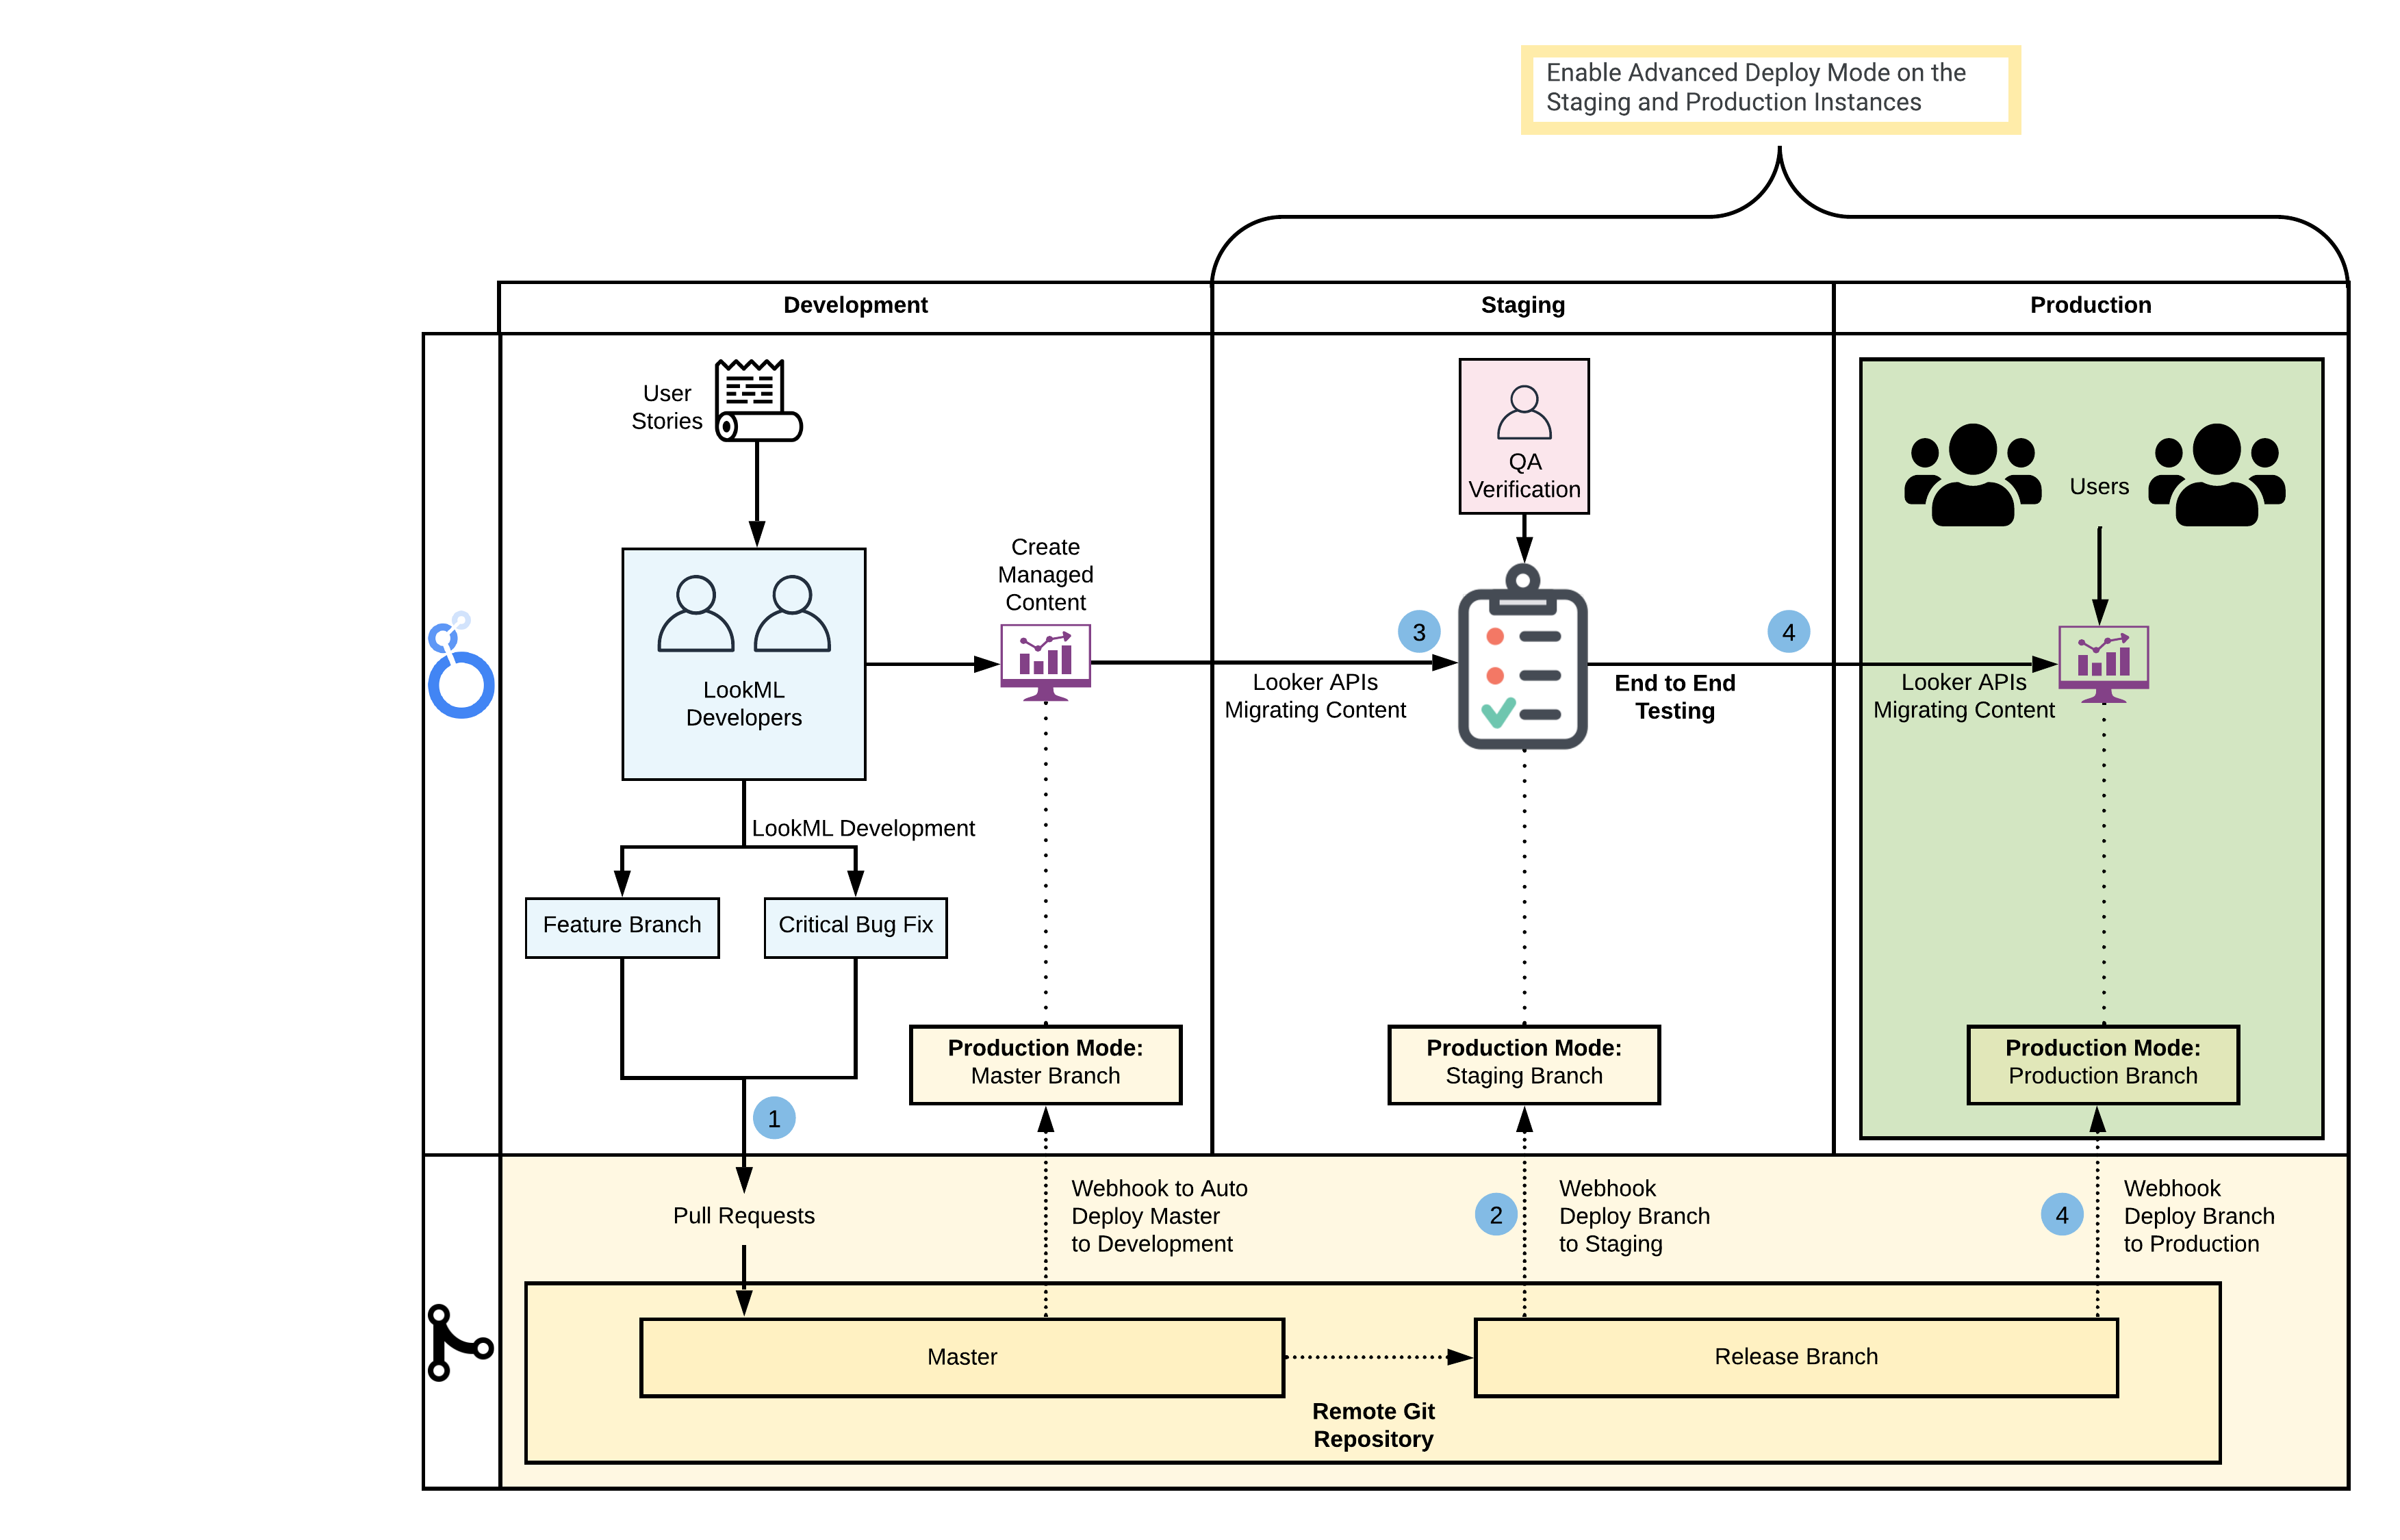
This example will walk through a typical three-instance setup: development, QA, and production. If you already have a development/QA database that you use, then the following example should show you an effective strategy and approach. In the following workflow, we'll be making these assumptions:
- LookML development will occur only in the development instance. The workflow can be adapted if hotfixes are committed in QA or production.
- Advanced Deploy Mode will be enabled on the QA and production instances. Code will be pushed to the master branch in the development instance.
- The name of the connection will remain identical across each instance; however, the host, port, or database settings will be different for each instance. More details on this can be found on our Admin settings - Connections documentation page. If different schemas are defined, Looker's user attributes can be used for dynamic schema name injection, along with LookML constants to reduce code duplication.
Depending on your requirements, the example below can be tweaked to suit your release cycle needs. This workflow stands on the shoulders of Gazer, a command line tool for Looker content management, and Advanced Deploy Mode, which allows developers to deploy any commit to the Production Mode of an instance.
To implement this workflow, follow these steps:
- Perform LookML development on the development instance.
- Developers make commits in feature branches.
- Data tests are run and passed, and a pull request (PR) is created.
- Workflow configurations are triggered and passed.
- Once the PR is approved, the deploy webhook is used to push changes to the master branch (ensure that the webhook deploy secret is set).
- Promote LookML code from development to QA.
- Create a release branch from master.
- Use a
deploy_ref_to_productionAPI endpoint to set Production Mode on a QA instance to the head of the release branch (this can also be any specific commit SHA or tag).
- Perform end-to-end testing on the release branch.
- Use the Looker API to sync new content from development to QA, and existing content from production to QA. You can use the export and import commands in Gazer to perform this step easily.
- Use the Content Validator to fix any errors.
- Run performance and stability tests.
- Coordinate promotion of LookML and content from QA to production.
- As in Step 2, use the
deploy_ref_to_productionendpoint to set Production Mode on the production instance to the head of the release branch. - Use the Looker API or Gazer to update content in production within the same script.
- As in Step 2, use the
Many of these steps can be automated and integrated with continuous integration tools. For example, on push or pull request events, workflows can be triggered to validate LookML and SQL (e.g., Spectacles for SQL validity tests or LAMS for a style guide and custom linting). For the purpose of this workflow, we will focus on the two main aspects of a release cycle: setting the Production Mode of an instance, and moving content across instances. Below is an example of how this could be set up:
Automation Examples
This example uses a Python script that leverages the Looker SDK for Python to deploy a Git reference to production (note: this can also be achieved using deploy webhooks). The looker.ini file will have a section for each Looker host containing their respective API credentials.
deploy_looker.py
We can run this script using: python3 deploy_looker.py 'mydomain.looker.com' 'release-xyz'import sys
import looker_sdk
from looker_sdk import models, error
ini_file = 'looker.ini'
project_id = 'my_looker_project' # project name in looker
instance = sys.argv[1] # host name e.g. 'mydomain.looker.com'
release_branch = sys.argv[2] # name of git branch, e.g. 'release-xyz'
sdk = looker_sdk.init40(ini_file, section=instance)
try:
sdk.deploy_ref_to_production(project_id=project_id, branch=release_branch)
print('Production mode for {} in {} set to branch: {} \n'.format(project_id, instance,
release_branch))
except:
print('Failed to Update Production mode for {} in {} \n'.format(project_id, instance))To promote LookML and content at the same time, we can leverage the above Python script along with a shell script that executes Gazer commands (installation steps and guidance for storing credentials can be found in the Gazer documentation). The example below will do the following:
- Run the above Python script
- Create a release branch folder locally to export content from the source host
- Import all files in the release branch folder to the destination host
By leveraging the --force flag in the import commands, Gazer will update the content with the redefined version, preserving the content ID, URLs for sharing, schedules, etc. Because we have a copy of the JSON files coupled with a specific release branch locally, these can also be added to version control for backup.
update_content.sh
This script can be from the command line as: ./update_content.sh 'mydomain.qa.looker.com' 'mydomain.prod.looker.com' 'release-1.4'#!/bin/bash
SOURCE_HOST=$1
DESTINATION_HOST=$2
RELEASE_BRANCH=$3
if [ -z "${SOURCE_HOST}" ] || [ -z "${DESTINATION_HOST}" ] || [ -z "${RELEASE_BRANCH}" ] ; then
printf "Usage: update_content \n"
exit 1
fi
python3 deploy_looker.py ${DESTINATION_HOST} ${RELEASE_BRANCH}
printf "Creating directory for current release ${RELEASE_BRANCH} \n\n"if [ -d "${RELEASE_BRANCH}" ]; then rm -rf ${RELEASE_BRANCH}; fi
mkdir ${RELEASE_BRANCH}
jq -c '.[]' folder_config.json | while read i; do
folder_name=$( echo $i | jq '.name')
source_folder_id=$( echo $i | jq --arg sh ${SOURCE_HOST} '.[$sh]')
destination_folder_id=$( echo $i | jq --arg dh ${DESTINATION_HOST} '.[$dh]')
# store updated content json from source in release branch directory
printf "Exporting folder ID ${source_folder_id}: ${folder_name} from ${SOURCE_HOST} using gazer \n\n"
gzr space export ${source_folder_id} --host ${SOURCE_HOST} --dir ${RELEASE_BRANCH} printf "Export of folder ${folder_name} successful \n\n"
# import all content to destination per folder
printf "Importing folder ID ${destination_folder_id}: ${folder_name} to ${DESTINATION_HOST} using gazer \n\n"
eval cd "${RELEASE_BRANCH}/${folder_name}"
find . -maxdepth 1 -name 'Look_*.json' -exec gzr look import "{}" ${destination_folder_id} --host ${DESTINATION_HOST} --force \;
find . -maxdepth 1 -name 'Dashboard_*.json' -exec gzr dashboard import "{}" ${destination_folder_id} --host ${DESTINATION_HOST} --force \;
cd ../..
printf "Import of folder ${folder_name} successful \n\n"
done
printf "Migration from ${SOURCE_HOST} to ${DESTINATION_HOST} complete \n\n"This shell script expects a configuration file that will be used for mapping the folder IDs used for content in each instance. This is necessary because the IDs used in each environment are incrementally system generated, so there is no way to ensure that each object has the same ID in different systems (this is also important to remember when querying data in System Activity). Here's an example of how that configuration would look:
folder_config.json
[
 {
 "name": "Meeseeks Place",
  "mydomain.dev.looker.com": 38,
  "mydomain.qa.looker.com": 16,
  "mydomain.prod.looker.com": 7
 },
 {
  "name": "Gromflomites Prime",
  "mydomain.dev.looker.com": 40,
  "mydomain.qa.looker.com": 17,
  "mydomain.prod.looker.com": 8
 }
 ...
]
Looker recommends using a side-by-side folder configuration instead of a nested hierarchical structure, when possible, to make it easier to import/export content as well as to simplify folder management. For more details on folders and content access, refer to our best practices guide.
To see a recorded demo of this workflow, see the Multiple-Looker Instance Workflows video from the JOIN@Home 2020 conference. Bear in mind that this workflow will vary depending on your requirements.
Next, we will run through some additional modifications to consider when you're setting up your own workflow.
Stable Dashboard URL Mapping
For a user-defined dashboard (UDD), there is a way to assign a 22-character alphanumeric string to be used in place of the dashboard ID. This allows for stable URLs for user-defined dashboards across multiple instances, as a dashboard can have the same slug across instances. Thus, relative links using the slug can be used directly in the LookML model.
Note: The string must contain 22 alphanumeric characters (no more and no less), or else the Looker API will throw a 422 validation error.
The way to use this feature will be to leverage the update_dashboard endpoint and set the slug property. For example:
update_dashboard(dashboard_id, {"slug": "thisismynewslugexample"})Using slugs means that links in the LookML project can point to /dashboards/thisismynewslugexample instead of /dashboard/123 in the development instance and /dashboards/456 in the production instance. LookML constants can and should be used to reduce clutter in the project. Note that each dashboard can have only one slug, which must be unique across the instance.
If you are using Gazer in your workflow, note that Gazer will always retain the slug from the source instance to the target, unless the slug already exists in the target. So, Gazer will automatically account for this in the gzr dashboard import command.
LookML Dashboards
Another approach to promoting content between instances would be to use LookML dashboards, which are defined and stored inside the LookML project. As expected, this makes promotion between instances more straightforward; however, the drawbacks to using LookML dashboards are that there is no folder access control and that they are more difficult to update.
To counter this limitation, you could use the import function to convert from a LookML dashboard to a user-defined dashboard in the production instance to copy the dashboard to a specific folder. Furthermore, the see_lookml_dashboards permission can be removed so that users see dashboards only in folders.
The main disadvantage of using a LookML dashboard and converting it to a user-defined dashboard is that this will generate a new dashboard each time. This means that the new dashboard will replace the older one. Any links to the old dashboard, favorites, schedules, and browser bookmarks will no longer be valid.
To address this point, there are two API endpoints that can be used to sync LookML dashboards and user-defined dashboards. Using these endpoints enables users to use LookML dashboards for movement and Git versioning in addition to leveraging folders for content management. The endpoints to use are import_lookml_dashboard and sync_lookml_dashboard. These endpoints are compatible with tile, static, and newspaper legacy dashboard layouts (the grid layout is not supported). Dashboards that use the new dashboard experience must be saved with the newspaper layout.
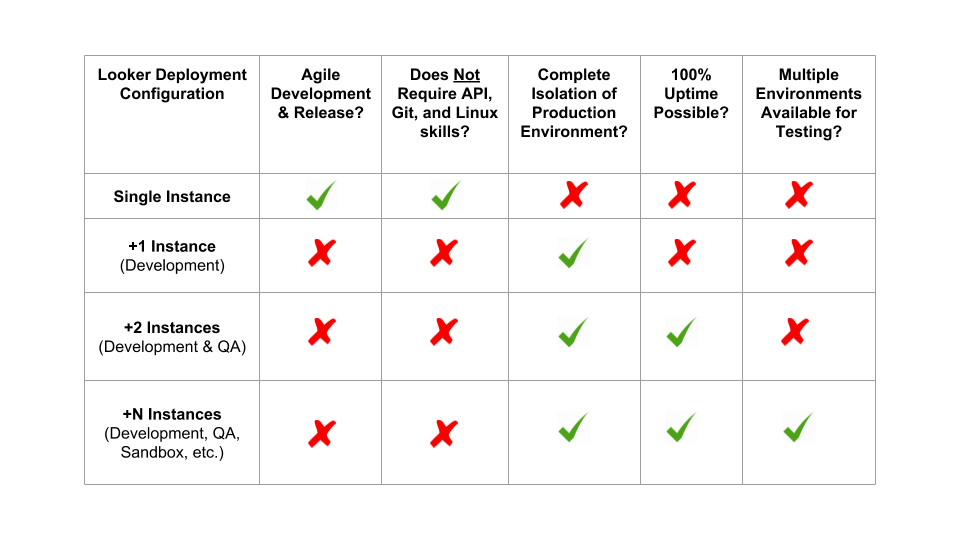
How Many Instances?
The example described above has three separate instances; however, the number of instances will vary depending on your needs. For a requirement of 100% uptime, meaning that users do not ever experience any significant unplanned downtime, then we would recommend having a minimum of three instances. This will allow for proper stratification of each task in each instance.
Additional instances, often referred to as experimental instances or sandbox instances, could be useful for testing out significant Looker instance-wide changes in isolation, away from the LookML and content workflow. Based on the benefits and disadvantages of instances, here's a summary for each deployment configuration to consider:
Where to Create Content
Some Looker deployments choose to create content only in the production instance, others choose to create content upstream in development or QA, and some choose to create in all instances. The decision on where content should be created should be based on how your users will be interacting with Looker. Some key questions to consider are:
- Will you have a set of managed reports for users?
- Will business users have the permission to create content, or will they only consume reports?
The release cycle must be flexible to accommodate whichever system you're trying to implement. Looker recommends that you fully leverage the QA environment as a mixing ground to centralize any changes, both upstream and downstream. If content is created in multiple environments, then changes must be centralized first before any content validation and QA tests are run and before any changes are pushed back to production.
4. Conclusion
Managing multiple instances will require a strong development team with knowledge of Git and the Looker API. Looker strongly recommends that you have a code deployment strategy in place before embarking on this path.
This guide references Gazer, an open source command line tool for content portability that fully leverages the API 3.1 endpoints. Gazer currently sits outside of the core product, and is not officially supported as part of Looker. For the purposes of this article, Gazer's functionality can be replicated by Looker API calls if needed.
Comments
david_lilley-16
New Member
- Mark as Read
- Mark as New
- Bookmark
- Permalink
- Report Inappropriate Content
07-06-2022
07:45 AM
In the examples of the automation do the different instances each have their own repos?
davidtamaki
Staff
- Mark as Read
- Mark as New
- Bookmark
- Permalink
- Report Inappropriate Content
07-12-2022
11:07 AM
@david_lilley-16 The repo is shared for all the instances in this example.
For a more in-depth look at the Git workflows I recommend checking out the examples described in this article:
https://community.looker.com/technical-tips-tricks-1021/git-deployment-strategies-with-looker-30242
markus_zhang

Bronze 2
- Mark as Read
- Mark as New
- Bookmark
- Permalink
- Report Inappropriate Content
07-20-2022
01:41 PM
Hi, very good article. One question, at the end of Step 1, you said:
- Once the PR is approved, the deploy webhook is used to push changes to the master branch (ensure that the webhook deploy secret is set).
Do you mean this is a merge into production branch? I think the production branch is always the master branch, so this is confusing. Thanks!
davidtamaki1
New Member
- Mark as Read
- Mark as New
- Bookmark
- Permalink
- Report Inappropriate Content
08-02-2022
03:15 AM
@markus_zhang Yes that’s correct, it is to push the updated master branch to the development instance (which updates the production mode)