- Looker
- Looker Forums
- Administering Looker
- Re: setup an SSH tunnel server to connect Looker t...
- Subscribe to RSS Feed
- Mark Topic as New
- Mark Topic as Read
- Float this Topic for Current User
- Bookmark
- Subscribe
- Mute
- Printer Friendly Page
- Mark as New
- Bookmark
- Subscribe
- Mute
- Subscribe to RSS Feed
- Permalink
- Report Inappropriate Content
- Mark as New
- Bookmark
- Subscribe
- Mute
- Subscribe to RSS Feed
- Permalink
- Report Inappropriate Content
Sometimes, you need to connect Looker to your database but you are not a data engineer, so it is handy to have a guided step by step. the sources are the Looker SSH tunnel doc and some google cloud SQL doc
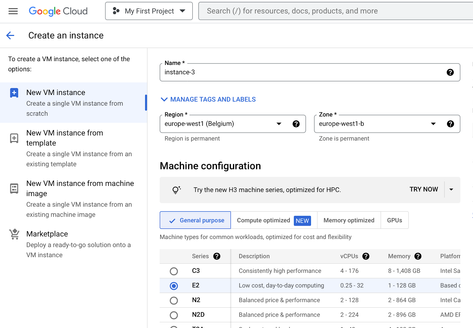
In your console, on in compute engine and press create instance:
Select the region closest to your database, select E2
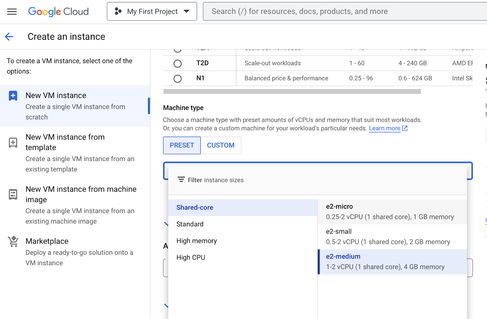
In machine type, press preset and select shared-core and e2-micro
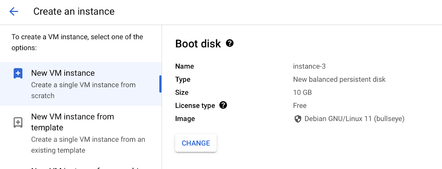
In boot disk, press change:
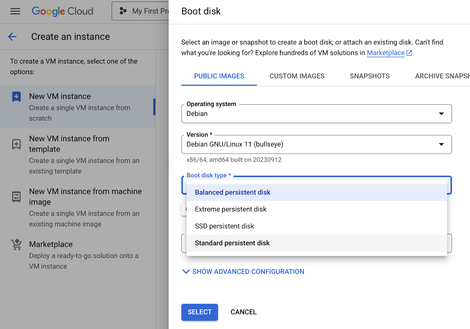
Select standard permanent disk
Then press select.
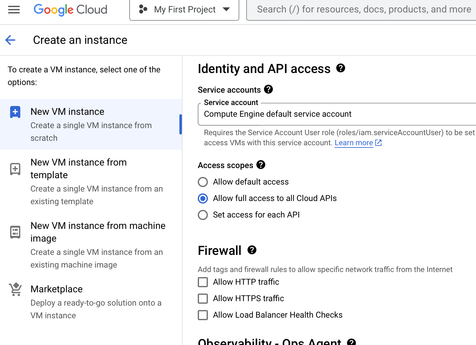
Then in identity and api access, select allow full access to all cloud api
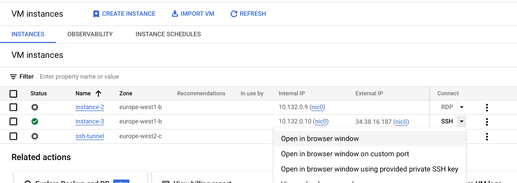
Then press create instance. Now next to the ssh button below connect, press open in browser window
Press authorize
Now enter the following command:
Download the Cloud SQL Auth Proxy:
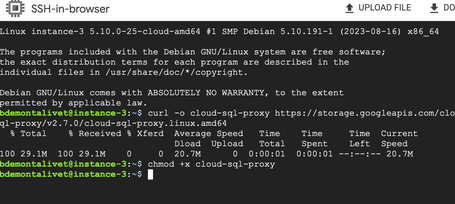
curl -o cloud-sql-proxy https://storage.googleapis.com/cloud-sql-connectors/cloud-sql-proxy/v2.7.0/cloud-sql-proxy.linux.amd64
Make the Cloud SQL Auth Proxy executable:
chmod +x cloud-sql-proxy
Now create a group called looker:
sudo groupadd looker
Create user looker and its home directory:
sudo useradd -m -g looker looker
Switch to the looker user:
sudo su - looker
Create the .ssh directory:
mkdir ~/.ssh
Set permissions:
chmod 700 ~/.ssh
Change to the .ssh directory:
cd ~/.ssh
Create the authorized_keys file:
touch authorized_keys
Set permissions:
chmod 600 authorized_keys
Now, in your looker instance, In the Connections page in the Admin section of Looker, select the SSH Server tab.
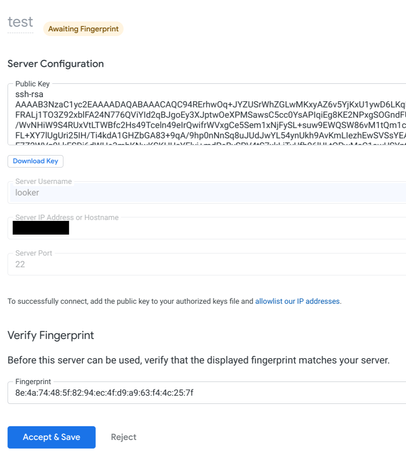
Then select Add Server. Looker displays the Add SSH Server page:
Add a name to your server!
Press download key, open file and copy the content.
Go back to the command line and edit the authortized_keys by entering the following command:
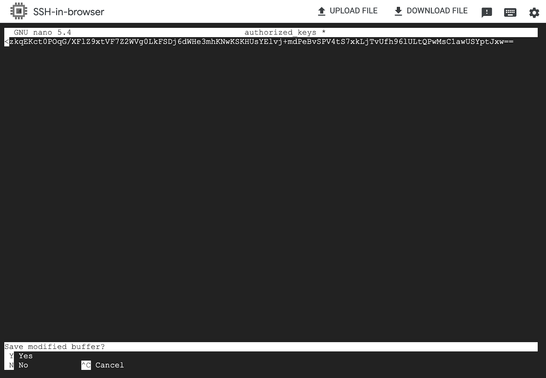
Nano authorized_keys
Now copy the key you downloaded from your looker instance. It should only be on one line
Then press f2 to save and confirm pressing Y, and press enter to confirm
Then type exit to go back to your user
Exit
We now need to add the ssh-rsa to your server's list of accepted algorithms. Here's how. We need to Edit your sshd_config file:
Sudo nano /etc/ssh/sshd_config
And add the following at the end of the file
HostKeyAlgorithms +ssh-rsa
PubKeyAcceptedAlgorithms +ssh-rsa
Press f2 to save and confirm with Y
now , on your cloud SQL instance, get the instance connection name which should have the format projectID:region:instanceID
And back into the command line, type the following and replace the connection_name with yours:
./cloud-sql-proxy --private-ip projectID:region:instanceID
When the Cloud SQL Auth Proxy starts successfully, a message similar to the following appears in the SSH window:
Listening on 127.0.0.1:3306 for myInstance
Ready for new connections
Now go back to your looker instance,
For the ip address, you select the public ip address of your vm instance:
You should have this, press test and request fingerprint
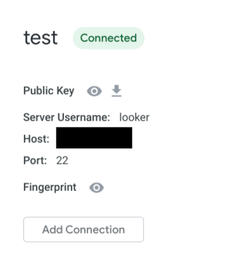
Press accept and save
Dont press add connection as it redirects to the old UI
But click on the connection menu and press add connection
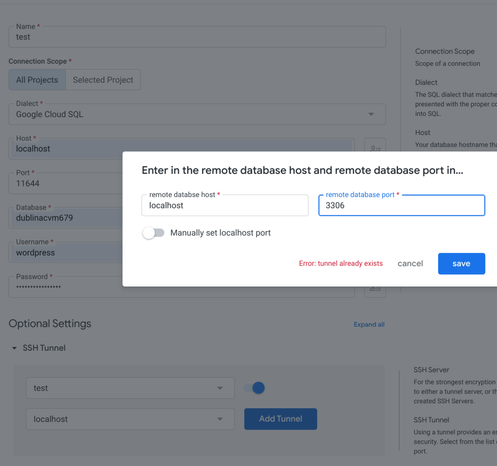
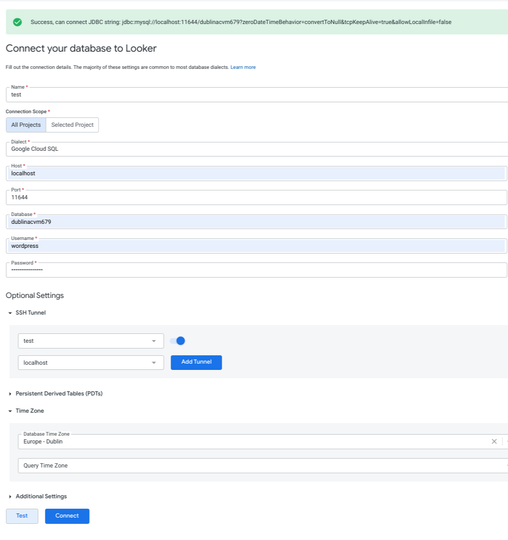
Now enter the details of your database, for the host put localhost and port 3306
In optional settings enable ssh tunnel, select your tunnel and press add tunnel.
Add localhost and port 3306
Press save and the test!
And hopefully you will the success sign!
- Labels:
-
General Looker Administration
- Mark as New
- Bookmark
- Subscribe
- Mute
- Subscribe to RSS Feed
- Permalink
- Report Inappropriate Content
- Mark as New
- Bookmark
- Subscribe
- Mute
- Subscribe to RSS Feed
- Permalink
- Report Inappropriate Content
Thank you! Is this solution applicable for Cloud based Looker Studio also?
- Mark as New
- Bookmark
- Subscribe
- Mute
- Subscribe to RSS Feed
- Permalink
- Report Inappropriate Content
- Mark as New
- Bookmark
- Subscribe
- Mute
- Subscribe to RSS Feed
- Permalink
- Report Inappropriate Content
you would only need to do this for Looker studio if your cloud SQL database doesn't have a public ip address , otherwise it would be unnecessary
- Mark as New
- Bookmark
- Subscribe
- Mute
- Subscribe to RSS Feed
- Permalink
- Report Inappropriate Content
- Mark as New
- Bookmark
- Subscribe
- Mute
- Subscribe to RSS Feed
- Permalink
- Report Inappropriate Content
Thank you! Maybe I am confused, In my Looker Studio configuration I have no Connections page in the Admin section of Looker Studio, so I am not able to select the SSH Server tab. My plan is to use Private IP in my MSSQL GCP Instance to increase security and access it via SSH tunneling as you described, but I have no Connection and SSH Server pages in my Looker Studio configuration. I am using Cloud hosted Looker Studio instance, maybe that is the reason why I have no Connections page.
-
access grant
5 -
actionhub
2 -
Actions
4 -
Admin
32 -
alert
6 -
Analytics
1 -
Analytics Block
16 -
API
10 -
Authentication
13 -
bestpractice
1 -
BigQuery
13 -
blocks
2 -
boards
5 -
Bug
30 -
cache
3 -
Cloud Error Reporting
1 -
Cloud Load Balancing
1 -
connection
20 -
connection database
4 -
content access
4 -
content-validator
2 -
custom field
2 -
custom measure
1 -
Dashboards
27 -
Data
1 -
Data Sources
1 -
Database
13 -
datagroup
1 -
derivedtable
1 -
develop
1 -
development
2 -
done
1 -
download
4 -
downloading
2 -
embed
8 -
Errors
9 -
explore
9 -
Explores
1 -
Extensions
1 -
feature-requests
2 -
filed
1 -
filter
12 -
folders
2 -
formatting
1 -
General Looker Administration
163 -
git
16 -
Google Sheets
1 -
googlesheets
1 -
i__looker
3 -
imported project
1 -
Integrations
1 -
internal db
4 -
liquid
1 -
Looker
5 -
LookerStudio
1 -
lookml
13 -
looks
4 -
manage projects
2 -
Marketplace
2 -
model
1 -
modeling
1 -
mysql
5 -
Networking
3 -
pdf
1 -
pdt
6 -
performance
3 -
permission management
12 -
Projects
3 -
query manager
1 -
redshift
6 -
release
9 -
rendering
1 -
Reporting
1 -
schedule
20 -
schedule delivery
2 -
sdk
2 -
Security
8 -
server configuration
2 -
Setting up your Looker Instance
35 -
sharing
2 -
snowflake
1 -
sql
4 -
SSO
7 -
system activity
8 -
time zone
2 -
Training
2 -
Ui
2 -
usage
5 -
User access & management
47 -
user access management
10 -
user management
8 -
user-attributes
9 -
visualizations
7 -
webhook
3
- « Previous
- Next »

 Twitter